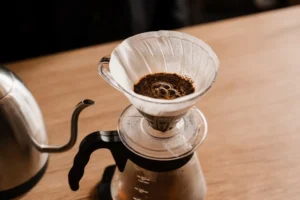
There’s a reason pour over coffee has quietly taken over café counters and kitchen counters alike. It isn’t a gimmick or a barista flex — it’s just the most direct way to taste what a bean actually is. No pressure, no pump, no shortcuts. Water meets coffee, gravity does the rest, and everything the roaster and the farmer got right (or didn’t) shows up in the cup. If you’ve been drinking the same instant or drip coffee for years, pour over coffee is the upgrade that costs you five minutes, not five thousand rupees.
Why Pour Over Tastes Different
Pressure-based methods — espresso, moka pot, even some drip machines — force water through the grounds fast. Pour over does the opposite. You control the water, the pace, and the contact time by hand, which means you control extraction directly instead of leaving it to a machine’s default settings. The result is a cup that’s clean, bright, and layered, with the coffee’s own aromatics doing the talking instead of getting muddied by over-extraction. It’s the same principle that makes freshly roasted coffee worth seeking out in the first place: the cleaner your inputs, the more a careful method can show off.
The Equipment You Actually Need
You don’t need a wall of gear. Four things get you there:
A dripper. Cone-shaped drippers (V60-style) give a fast, bright cup; flat-bottomed drippers (Kalita-style) are more forgiving and give a rounder body. Either is fine to start — the dripper matters less than the water going into it.
A filter. Paper filters give the cleanest cup and strip out most oils and sediment. Metal filters let more body and oil through, closer to a french press in texture. Rinse paper filters with hot water before brewing — it removes papery taste and preheats your dripper.
A kettle with a narrow spout. This is the one piece of gear worth spending on. A narrow “gooseneck” spout lets you pour slowly and precisely instead of dumping water in one splash. Precision here is most of what separates a good pour over from a mediocre one.
A scale. Pour over is a ratio game, and eyeballing it is where most home brews go wrong. A basic kitchen scale is enough.
Getting the Ratio and Grind Right
The standard starting ratio is 1:16 — one gram of coffee to sixteen grams of water. So 20g of coffee to 320g (roughly 320ml) of water makes a solid single cup. Want it stronger, nudge toward 1:14. Want it lighter, go 1:17 or 1:18. There’s no single correct number, just a starting point to adjust from once you know your own taste.
Grind size should be medium — think coarse sand, finer than french press but coarser than espresso. Too fine and water sits on the grounds too long, pulling out bitterness. Too coarse and water rushes through before it’s extracted anything worth drinking. If your local Paul John Caffeine bag doesn’t come pre-ground, a burr grinder set to a medium setting is the difference between a great cup and a thin, sour one.
The Step-by-Step Method
1. Boil water and let it sit for 30 seconds off the heat — you want it around 92–96°C, not a rolling boil, which can scorch the grounds.
2. Rinse the filter with hot water, then discard that water and place your dripper on your cup or server.
3. Add your ground coffee and level the bed gently.
4. Bloom first. Pour just enough water to saturate all the grounds — roughly double the coffee weight — and wait 30–45 seconds. You’ll see it bubble and puff up as trapped CO2 escapes. Skipping this step is the single most common reason pour over tastes flat.
5. Pour in slow, steady circles, working from the centre outward and back, keeping the water level fairly consistent. Avoid pouring directly onto the paper filter’s edge.
6. Finish within 2.5–3.5 minutes total. If it’s running much faster, your grind is too coarse. Much slower, too fine.
It sounds like a lot written out. In practice, it’s a five-minute ritual that becomes second nature within a few tries.
Why Light Roast Arabica Is Made for This
Pour over rewards beans with more going on — the fruity, floral, tea-like notes that a slower, gentler extraction can actually surface instead of drowning in bitterness. That’s exactly the profile of PJC Light Roast, built from 100% arabica coffee beans and roasted specifically to preserve those brighter, more expressive notes. A dark roast leans smoky and heavy no matter how you brew it; a light roast is where pour over earns its reputation. If you’ve tried pour over before with a dark or blended bean and found it underwhelming, the method wasn’t the problem — the bean was.
This is also where specialty coffee and pour over overlap almost completely: single-origin, traceable, carefully roasted beans are the ones worth the extra five minutes of attention pour over demands.
Common Mistakes Worth Fixing
Pouring too fast. If you dump all your water in 15 seconds, you’ve basically made a weak immersion brew, not a pour over. Slow down.
Skipping the bloom. Trapped CO2 pushes water away from the grounds unevenly if you don’t let it escape first. Thirty seconds of patience fixes this.
Using stale beans. Pour over is unforgiving of tired coffee — there’s nowhere for a flat, stale bean to hide when the method is this transparent. Always check the roast date, not just the best-before date, before you brew.
Wrong grind for your dripper. A V60 typically wants a slightly finer grind than a Kalita. If your brew time is off, adjust grind before you touch anything else.
Bring It Home
Pour over isn’t about ceremony for its own sake — it’s about giving good coffee the conditions to actually show you what it can do. Pair the right dripper, the right ratio, and a bean that deserves the attention, and five minutes in the morning turns into the best cup of your day.
Ready to try it with a bean built for it? Buy coffee online from Paul John Caffeine and pick up a bag of Light Roast made for exactly this method. Order coffee online today, and taste what pour over is supposed to taste like.